How to Add an Hp3830 Wireless Printer Again
Z7_3054ICK0KGTE30AQO5O3KA30N0
hp-concentra-wrapper-portlet
![]() Actions
Actions
HP OfficeJet 3830, DeskJet 3830, 5730 Printers - Outset Time Printer Setup
This document is for HP OfficeJet 3830, 3831, 3832, 3833, 3834, 3835, DeskJet Ink Advantage 3835, 3836, 3838, DeskJet Ink Reward Ultra 5738, 5739 All-in-One printers.
To set up a printer for the first fourth dimension, remove all packing materials, connect the power cable, install the ink cartridges, and and then load paper into the input tray.
note:If you are looking for the printer software, get to:
Step one: Unpack the printer from the box
Remove the printer from the box, and then remove all tape, stickers, and packing materials from the printer.
-
Remove the printer from the box.
-
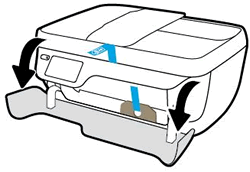
Remove all record and packing materials from the outside of the printer, so open the exterior door.
Effigy : Remove the tape, and then open the exterior door
-
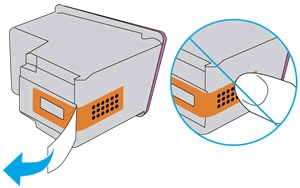
Remove the tape and packing textile from under the ink cartridge admission door.
Effigy : Remove the tape and packing fabric from under the ink cartridge access door

-
Open the ink cartridge access door, and then remove the tape and packing materials from inside the printer.
Figure : Remove the record and packing materials from inside the printer

-
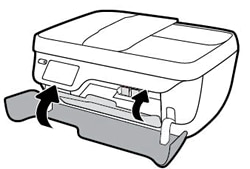
Shut the ink cartridge access door, and and so close the outside door.
Effigy : Close the ink cartridge admission door, and and so close the exterior door
Step 2: Connect the power cord, and so set the language, country/region, time, and date
Connect the power string, plow on the printer, and then enter your localization settings.
-
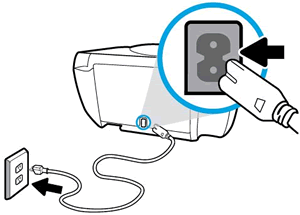
Connect the power cord to the rear of the printer, then plug the other end of the ability string into an electrical outlet.
Figure : Connect the power cord
-
Press the Power button to turn the printer on.
Effigy : Press the Power push

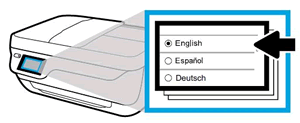
On the printer control panel, the Linguistic communication bill of fare displays.
Figure : Select your language
-
Impact your preferred language, and then impact Yes to confirm your option.
The Country/Region menu displays.
-
Affect your specific country/region, and so affect Yep to confirm your pick.
The Engagement/Time carte displays.
-
Select the appointment, and and then touch Next.
-
Select the time, and then touch Done.
Pace 3: Install the ink cartridges
Install the HP ink cartridges that shipped in the box with your printer.
-
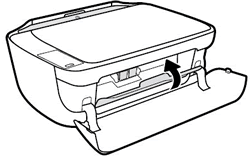
Open the exterior door, so the ink cartridge door.
The printer carriage moves to the center of the printer.
Figure : The printer wagon moves to the center of the printer

-
Wait until the printer is idle and silent earlier you keep.
-
Remove i of the ink cartridges from its package. Be conscientious to touch but the black plastic on the ink cartridge.
-
Remove the protective tape.
caution:
Do not affect the copper-colored contacts or the ink nozzles. Exercise not supersede the protective record on the contacts. Handling these parts can event in clogs, ink failure, and bad electrical connections.
Effigy : Remove the tape and avert touching the ink cartridge contacts or ink nozzles
-
Slide the new ink cartridge at a slight upward bending into the empty slot, then gently push button up on the ink cartridge until it snaps into place.
-
Insert the tri-color ink cartridge (
 ) into the left slot.
 -
Insert the blackness ink cartridge (
 ) into the right slot.
Figure : Insert the new ink cartridge

-
-
Repeat these steps to install the other ink cartridge.
-
Shut the ink cartridge access door, and then close the exterior door.
Figure : Close the ink cartridge access door
Step 4: Load paper into the input tray
Load plain white newspaper in the input tray afterward you unpack the printer from the box.
-
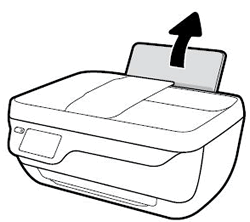
Raise the input tray.
Figure : Raise the input tray
-
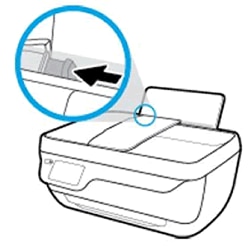
Slide the paper width guide all the way to the left.
Figure : Slide the paper width guide left
-
Load obviously white paper into the input tray, and then slide the stack of paper downwards until it stops.
Figure : Load plain white newspaper

-
Slide the paper width guide to the correct until it stops at the edge of the paper.
Do non push the paper width guide so far that it binds the newspaper.
Figure : Slide the newspaper width guide correct

-
Pull out the output tray, and then raise the tray extender.
Figure : Pull out the output tray, and so enhance the tray extender

Step 5: Align the ink cartridges
Aligning the ink cartridges is necessary to attain the best impress quality.
-
After loading the paper, touch OK, and then the printer automatically prints an alignment page.
notation:
The printer merely prints an alignment page automatically when new ink cartridges are installed.
-
Lift the scanner lid.
-
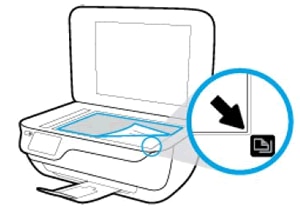
Place the alignment page with the print side down on the scanner glass, and so position information technology according to the engraved guides around the glass.
Figure : Place the alignment folio on the scanner glass
-
Close the scanner chapeau.
-
Touch OK to browse the page and complete the ink cartridge alignment.
Pace half-dozen: Install the printer software
Your HP printer hardware is at present set and y'all can install the printing software. Do non attempt to connect the printer to a computer until instructed to practise then in the printing software.
Download the latest version of the printing software from the following HP websites:
Source: https://support.hp.com/us-en/document/c04638137
Post a Comment for "How to Add an Hp3830 Wireless Printer Again"